


 Hindi Dubbed Movie")


Crochet? I’ll never learn that! ”You might be thinking. But that’s not true – anyone with two hands, a crochet hook, and thread can learn to crochet. To make your first crochet projects, such as reusable cosmetic pads, a simple dish sponge, or dishcloth, a success, you don’t need more than a few simple basic steps. Chain stitches, single crochet stitches, slip stitches. How to move from one row to the next and how to increase or decrease stitches. You can learn all of this here!
Table of Contents
The beginning of crocheting
Everything starts with a loop. To crochet, a simple loop with a knot, double the thread end, fold the loop down once so that a kind of “small pretzel” is created, and then guide the crochet hook from front to back and back through the “pretzel ears” and tighten slightly. Now take the long end of the thread and wrap it loosely around the fingers of your left hand. Grab the thread with the needle and thread a loop through the “pretzel ears” and tighten. Complete!
Chain mesh to crochet
Most beginners to crochet first learn to crochet long chain stitches. Children in particular often have a lot of fun doing it without end. A chain mesh consists only of a loop that is pulled through the previous loop and so on. Always keep the long thread loosely wrapped around the fingers of your left hand so that it can slide evenly. Hold the stop knot with your thumb and ring finger. Try to make the chain meshes the same size as possible, you will get a feeling for this over time.
Change to the next row
If you want to add more rows to the chain of stitches, one or more spiral chain stitches are necessary first. If you want to continue crocheting with single crochet stitches, then insert a spiral chain stitch in between to switch to the next row, with higher stitches (for example double crochets) it is best to use two or three of them. Then you turn what has already been crocheted and stitch in the last stitch before the turning stitches.
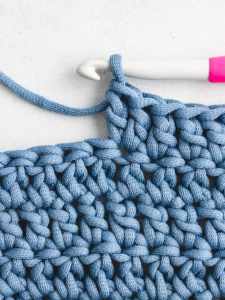
Single crochet Single crochet
Stitches are the main part of a simple crochet project. The second row is the most difficult, as the single crochet stitches have to be placed in the chain stitches of the first row. From the third row onwards, single crochet stitches are set into single crochets stitches, which is much easier to do. Stitch in the last stitch of the previous row and pull the thread forward as a loop. There should now be two loops on the needle.
Slip stitches to crochet
If stitches are to be “closed”, i.e. a hem is to be crocheted, or two stitches that are a little further apart are to be held together, slip stitches are used. To do this, just like with the single crochet stitches, insert the stitch in the previous row and pull the thread through from the back – but also through the loop on the needle, so that immediately there is only one loop on the needle.
Increase stitches to crochet
You can get wider and wider from row to row by increasing the number of stitches – either integrated into the row, which enables an even, step-free increase, for example for trapezoidal shapes or overhanging at the edge, whereby an increase in any large step even in only one row becomes possible.
1. Integrated increase:
Distributed evenly on a row or just in the respective edge stitch, simply set two single crochets stitches by stitching twice in the same stitch
2. Overhanging increase:
At the end of a row, simply crochets as many chain stitches as you want and only then switch to the next row with a spiral chain stitch. The next row then begins by piercing the chain stitches you just placed.
The end of a crochet piece
When your crochets project is complete, don’t just cut the thread at the last stitch, leave about four inches of thread before you cut it. Then pull the end of the thread completely through the last loop on the needle and tighten.
Pierce the thread (it is best to thread a needle through several stitches of your crochets piece) and cut it off. Complete!
With these basics you will know everything you need to crochets a potholder.
Also read: how to make an omelet


