


 Hindi Dubbed Movie")


Table of Contents
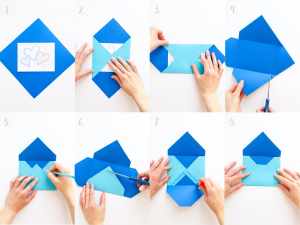
Tinker envelope (glued)
This variant is suitable, for example, if you want to use the envelope for a self-made letter of any size. In the last few steps, you can still vary the length and thus adapt it to the letter.
The materials:
- A sheet of paper
The instruction:
1: Put the sheet of paper in front of you on the table. It should be in landscape format, so the longer side is horizontal in front of you.
2: Now, fold the top part down so that the leading edge lies on top of the bottom edge. Smooth out the crease with your hand and then open the fold again.
3: Now, turn the paper so that it is in front of you in portrait orientation. The short sides are now horizontal. Take the top right corner and bend it towards the vertical centerline. Make sure that all edges are flush with each other. Brush the crease tight, creating a triangle on the upper right side.
4: Next, take the top left corner and fold it towards the centerline. A total of two triangles have now been created on the top.
5: Now rotate the paper again. It must now lie lengthways in front of you, the point on the former upper side pointing to the left. Now you have to fold the upper edge down around 2 to 3 centimeters. Do the same for the lower side.
6: Now, take the right side and fold it to the left. The edge should be flush with the bottom of the triangle. Flatten the edge and open the fold again.
7: You can now slide the letter into the envelope.
8: Fold the right side of the envelope back to the left.
9: Now fold the left triangle over the letter. Use scotch tape to stabilize the folds and seal the openings. From the outside, the envelope now looks like a natural envelope.
Origami-technique envelopes
If you want to produce an envelope for a sheet of A4 or A5, then this technique is well suited.
Material:
For a sheet of A4 size (21 x 29.7 cm), you need a sheet that is at least 30 x 30 centimeters in height. On the other hand, if you want to pack a postcard or a photo measuring 9 x 12.5 cm, the sheet should be at least 13 x 13 cm.
Instructions:
1: Place the paper in front of you on the table so that one point is facing you. Fold this tip up to the opposite end.
2: Now, take the tip you just folded again and fold it back down to the bottom edge.
3: Now fold the left corner in a horizontal direction to the right. The tip is now on the horizontal line, and the edges are flush. The end protrudes a little over the centerline.
4: In this step, take the right corner and do the same. Here, too, the tip has to protrude a little above the centerline.
5: Now, use the small protruding point and fold it to the right. This folding created a small triangle.
6: Unfold the triangle to make a square. This square is suitable for sealing the letter. To do this, fold the top tip down to be inserted into the opening of the yard.
7: Trace all the edges again with your finger so that the envelope holds as if by itself. However, if you want to be on the safe side, secure the envelope with some glue.
Paper sizes, materials, and costs
DIN A4: A sheet of paper the size of DIN A4 has an area of 21 cm x 29.7 cm. File folders, loose-leaf binders, and printers are usually adapted to this format.
DIN A5: The DIN A5 format has a size of 148 × 210 millimeters.
C6: The size C6 refers to envelopes and represents the dimensions 114 × 162 millimeters.
Mini envelope: Mini envelopes have a particularly compact shape and are usually made of sturdy construction paper.
Also read: Samsung a51 price in Pakistan.


