


 Hindi Dubbed Movie")


Creativity is the best thing to do in your free time. It makes you more active and intelligent. Your mind feels fresh and this activity keeps you away from those activities that are worth less and time-wasting. Creativity consists of hundreds of things. It may be gardening, painting, sketching, sewing, paper art, etc. This article will teach how to make a boat using paper.
Table of Contents
Tools needed to make a paper boat.
The best thing about a paper boat is that all you need is just one piece of paper. By folding the paper at different angles, you can make a paper boat. Now have a look at the procedure of making a paper boat.
Step by step guide on paper boat formation
Step 1:
Take a paper sheet of rectangular shape to make a paper boat. In the beginning, you have to make two folds on paper. The important thing to note is how to make these folds. You have to fold the paper both vertically and horizontally. Take paper in your hand and fold it vertically first and to make it a neat fold move your finger on the boundary where fold takes place. After making a vertical fold, make a horizontal fold. Again with the help of fingers make it a neat one.
Step 2:
The next step is to unfold the paper. After unfolding, place the paper in a fold position but keep in mind that the paper should present an honest look. Now you have to fold its diagonals. Hold the upper right corner of the paper and join it with the center folding line of the paper. In the same way, hold the upper left corner and join it with the center folding line of the paper where the upper right corner of the paper meets. By dragging your finger, make it a neat one.
Step 3:
After following the above steps, you will see that there are two rectangular strips r, two rectangular, then turn around the paper and fold the other side at the bottom of the page. Keep in mind that don’t fold the whole paper, you just have till the end of triangular-shaped folding. Don’t forget to move your fingers to make it’s folds clean.
Step 4:
In the next step, round the edges of the rectangular-shaped strips, you folded in the previous step. Keep both edges behind the big triangle and repeat the procedure for the other side.
Step 5:
The next step to making a paper boat is to convert the result into a diamond shape. To do this, pick up the paper and fold it so that it’s both the right corner and left corner touch together. Move your finger on all of the sides of a diamond to make it neat and perfect.
Step 6:
Now again you have to convert the result into a triangle shape. But this time, the triangle should be small in size. To make it possible, pick up the lower corner of the diamond, fold it towards that folder, and do the same thing wi,th the other side of the diamond. Now your diamond is converted into a small triangle.
Step 7:
The next step is to convert the triangle into a diamond, but this time the diamond but all in size. You just have to meet the left corner with the right corner of the triangle this time. Now you have a small diamond-shaped paper.
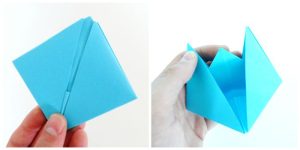
Step 8:
Your paper boat is just one move away. The final move to making a paper boat is to stretch both ends of the diamond, and you will see a paper boat in your hands. Take a small bucket and fill it with water. Then make a boat with different color papers and put them in the bucket.
Also read: How to get rid of headaches.


