


 Hindi Dubbed Movie")


The apps for Android. As well as the programs you use daily on your computer. Generate temporary data that serve to speed up their operation a little. And retrieve certain information more quickly. How to clear the cache on android They are the so-called cache files.
The cache files do not take up a lot of space on the memory. They are not dangerous from the point of view of privacy. But sometimes, their deletion allows them to solve the functioning problems of some applications. (those that, for example, suddenly close). Furthermore, If you use a smartphone or tablet that does not support memory expansion, their elimination allows the device to “breathe” without uninstalling the applications.
In short, if, for one reason or another, you need to clear the Android cache and you don’t know how to do it, take five minutes of free time and follow the instructions I’m about to give you. We will see how to clear cache files from Android settings. Get acquainted with some applications that Best in-ear headphones simplify the process of clearing the cache. And find out how to clear the temporary data of some browsers. Remember, this should only be done when really necessary and not necessarily on all apps simultaneously.
Table of Contents
How to clear Android cache: app
To empty the cache of Android applications. You can follow two different paths. Use the appropriate system function. They are acting on one application at a time. Or use an app specifically designed for the purpose—order to delete the cache of all apps in one go. Find everything explained below.
System function
To delete the content of the cache corresponding. To the applications installed on your Android device. First, open the latter’s settings by tapping on the gear symbol that resides on the Home screen or in the drawer. Tap on the App and notifications item. And then on the marked app information.
The exact path to follow varies according. To the version of Android installed on the device. On Samsung. For example. You have to go to Settings> Applications. While on Xiaomi smartphones. You have to reach the Settings> Apps> Manage apps sections.
![]()
Once you have reached the dedicated area of the operating system, tap on the name of the app for which you want to clear the cache. Then on the item Storage space and cache / Storage space and tap the Clear cache button. To clear the cache. Suppose you use a Xiaomi smartphone. However, You must first press the Delete data button (below) and. Then the item Empty the cache. Visible in the panel that appears at the bottom. Finally, go back and repeat the same operation for all the apps you intend to delete the cache.
SD Maid
If you are not satisfied with the default Android functionality, or if you want to delete the cache of all the apps at the same time, you can rely on an app designed for the purpose, such as SD Maid: it allows you to perform some cleaning and organization operations on Android, in a completely safe way and without the risk of running into spyware and other unwelcome apps (at least at the time of writing this guide).
SD Maid is an app available for free both on the Play Store and on devices not equipped with Google services; however, to finalize the cleaning (the free version only allows you to analyze the files in the cache), you need to purchase the Pro version of the app, which costs € 3.69 and can be obtained either through an unlocking app to download from the Play Store, which as an in-app purchase.
In any case, after downloading SD Maid (and possibly its activation app), start it and tap on the circular arrow symbol located next to the entry Cleaning applications, to start the first configuration of the app: then tap the Next item, tap the Allow button twice consecutively, tap the Next item again and tap the Allow button two more consecutive times, to authorize the app to examine the device usage statistics, or Skip, to deny it.
Delete All Unnecessary
Now, wait for the app cache scan to be completed and, to delete all unnecessary items at once, tap on the red trash can symbol located at the bottom right and, if you have not yet purchased SD Maid Pro, tap the In-app purchase button (if you want to proceed via in-app purchase) or Unlock App, if you want to enable the app by downloading its activator from the Play Store.
If, on the other hand, you are operating from a device not equipped with Google services, put the checkmark next to the item. I can not use Google Play and touch the link that appears immediately after downloading and purchasing the app.
Once the transaction is completed, if necessary, press the red trash can icon at the bottom right again and tap the Delete item to clear the cache for all the apps.
If, on the other hand, you only want to delete the cache relating to some apps, tap on the symbol (i) located next to its name, then on the trash can icon with the X located at the top of the panel displayed on the screen and, finally, on the item Delete. During subsequent uses, you can access the section dedicated to cleaning applications directly from the app’s main menu, which you can call up by touching the ☰ button visible at the top left.
How to clear the Android cache: browser
In some cases, clearing your Android browser cache can help you save valuable space on your device – I’ll show you how to do this on popular navigation apps below.
Google Chrome: How to clear the cache on android
Deleting the cache of the Google Chrome browser for Android is very simple: to start, tap on the symbol (⋮) located at the top right, select the History item from the menu that appears, and touch the item Clear browsing data …, which is located in high.
At this point, tap on the Basic tab, put the checkmark next to the item Cached images and files (removing it from the other boxes), and choose the time interval of the files to delete, using the menu of the same name. To empty the entire cache, set the latter to All. When done, tap the Clear Data button to proceed with deleting the cache.
Firefox: How to clear the cache on android
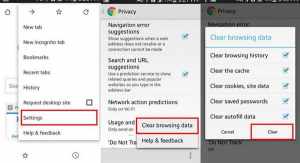
If your favorite navigation app was Firefox for Android, proceed as follows: after opening the browser, tap the button (⋮) located at the bottom right, tap the Settings item from the menu that appears, and reach the Delete the browsing data, visible in the Privacy and security box.
![]()
Finally, put the checkmark next to Cached images and files and tap the Delete browsing data button. That’s all!
Microsoft Edge: How to clear the cache on android
To clear the cache of the Microsoft Edge browser for Android, tap on the symbol (…) located at the bottom of the browser screen, touch the Settings button located in the panel that appears and touch the items Privacy and security and Clear browsing data.
![]()
Now, put the checkmark in the box next to the item Cached images and files, leave all the others deselected, and tap the Delete button located at the bottom to proceed with the deletion of the data.
Opera: How to clear the cache on android
To empty the cache of the Opera browser for Android, after starting it, touch the O located at the bottom left, tap the Settings item located in the menu that appears, and then tap the Delete browsing data … item, residing in the box Confidentiality.
Now, tap on the Advanced item, put the checkmark next to the item Images and files in the cache (leaving all the other boxes unchecked), and tap on the Delete data item, located at the bottom right, to finish.
How to clear Android cache: operating system
In some exceptional cases. For example, following an unsuccessful update. When problems occur with some system apps or again. When Android starts to work in a somewhat strange way. It could be decisive to clear the system’s cache. Entire Android operating system.
It is succeeding in the enterprise. However, it Is not very easy as it is necessary to act through an operating system external to Android. I called Recovery, which allows you to perform delicate operations on the device. Wireless headphones for tv, Including factory data, reset—installation of Custom ROMs, and cache cleaning.
Many Android devices have a built-in Recovery, which can be started by completely turning off the device—and turning it back on by pressing and holding the Power and Volume + keys.
The Recovery of Samsung devices, for example, allows you to clean up the Android cache quickly: after launching it, use the volume keys to select the Wipe cache partition item, press the Power key to give OK, and, in the same way, select the item Yes and give OK again. At the end of the procedure, select the item Reboot system now and OK, to restart Android in “normal” mode.
The Recovery presents “standard” on Android devices that are equipped. Generally, only allow you to restore the factory data and activate the ADB mode. Without being able to operate in any way on the cache. For this reason. It is often necessary to install a custom Recovery that can also act on the cache.
Necessary Act
This procedure, however, is not without risks, as it is necessary to act on highly delicate parts of the device, such as the bootloader (i.e., the small software that verifies the integrity of Android and runs it): to install a customized Recovery it is essential to unlocking the bootloader (with consequent loss of data on the device), enable USB debugging on the device and use the ADB software to load and run the custom recovery.
Unfortunately, it is enough to make a mistake, even a trivial one, in any of the required steps, to make the smartphone or tablet completely unusable (in jargon, to brick it ).
However, suppose you are still willing to learn more about installing a custom recovery capable of cleaning the Android cache, Brief history of amazon, such as TWRP. In that case, you can consult my guide dedicated to rooting on Android, which I explained how to proceed.
In any case, once the TWRP installation has been completed, start it by pressing and holding, from the phone/tablet off, the Power and Volume + buttons, tap the Clean button and tap the Advanced Cleaning button.
Now, put the checkmark exclusively next to the Dalvik / ART Cache item, taking care to leave all the others deselected (otherwise, you could format the device!) And swipe to the right in correspondence with the Swipe to clean the bar to start the cache cleanup. Finally, tap the Reboot system button to restart Android in its “normal” state.


